Dream Farm: Project Garden- The Build

Heya cats and kittens!

I don’t know how you all feel about getting dirty- like gardening dirty, not like creepy and inappropriate dirty.. this isn’t THAT kind of blog.

I really enjoy gardening. Now that we finally have all the space in the world on the Dream Farm, I decided to get my handy-skills out and conquer one small slice of all that dirt to make a garden!

I did a lot of research first. Have you ever heard of “Companion Planting”? If not, I suggest you Google it. And then Pinterest search it. Be prepared to fall down a rabbit hole of information! Basically, it’s the idea that some veggies/plants grow better near others, and much worse near different ones… so the idea is to plan your garden(s) to optimize their awesomeness, and keep the grumpy neighbours apart. A happy garden is like a functional 60s sitcom neighbourhood. An unhappy garden is like living next to a scavanged carcass. Or, you know, just a lot of dead vegetables. I might exaggerate the importance here. Anyway, If you’re going to grow stuff, you might as well grow it NICELY, right? So, I did all this research, and here is my garden map. Yeah. I planned this out like a weirdo, in my bullet journal. I know. It’s gross.

20170511_161040

So, if you zoom in, you’ll see I actually have 2 garden beds. One is for “brascias”, and one is for .. uh… salsa stuff. Nightshades? Something like that. I also planned where to put it, as it needed to be somewhere near full sun most of the day, and I knew I was going to have to fence it to keep the local wildlife away- we have bunnies, and deer (which I haven’t seen, but have been warned about), and voles, and something that left some really big doggy-type foot prints, but maybe hasn’t been back since.

I decided to make each bed 6ft by 4ft, so it would be easy to reach to the centre from any side, thereby making me NOT have to sit inside the garden to tend it, and thereby also hopefully not squashing anything with my butt. I used UNTREATED pine boards for the boxes, so that the treatment stuff wouldn’t leach into my plant-babies, and I used organic soil (cuz that’s what was on sale at Rona. Honesty.). The reason I built boxes, instead of just planting in the ground, is because our soil is clay, and also, since it was all dug up recently to put in the new septic bed, it just seems like a weird idea to plant food where things..uh… disperse. Know what I’m saying?

Here are my supplies:

4 pieces of 6ft by 12″ pine

4 pieces of 4ft by 12″ pine

screws

drill

16 bags of organic black soil

newspapers

enough very small weave chicken wire to cover the bottom of each box

Fence stakes

A shovel or flat roofing shovel

A large roll of larger-weave chicken wire

2 hinges

staple gun and staples

a bunch of small paving stones (Thanks Laura and Koree!)

a rubber mallet

Lots of sweat. Like, LOTS.

Steps:

1.Decided where to put those gardens. Get one of your 6ft pieces of pine, and one of the 4ft pieces. Brace them, and drill the corners together to make an L. Now do a 7 using another 6ft and 4ft piece… and then attach those together. TADAA! FIRST BOX DOWN!

Repeat for box 2, then drag them around until you have them in the right spot. Remember to leave at LEAST a 16″ border all around, and between each box, so you can navigate around them. I left 2′ between, so I can comfortably sit between them.

2. I covered the ground underneath with my small-gauge chicken wire, and then I covered THAT with newspaper, to help limit the grass from growing up into my gardens. I guess I could have cut the sod, but the gardens are actually in one of the few areas WITH grass in the yard, and cutting grass is hard, and I was already sweating like Aquaman in the desert, so I skipped that. Then I filled those babies with dirt! Allllll the dirt.

3. Now for the fence! THIS part i DID do some digging- made my lines in the turf, and dug it out a little so the fencing would slide in a little, and so I would put my posts in a straight line. I figured out the spacing for them, and used my rubber mallet to really wail on them until they were about a foot into the dirt. I spaced mine about 2.5′ apart, and that back fence is the back wall- I made sure each of those two back corners had a tight post against it. Once those were in, I started unrolling my heavier chicken wire, and stapling it to the posts. THIS WAS THE HARDEST DAMN PART! holy moly- GET A FRIEND TO HELP YOU! I thought I might sweat/swear myself to death doing this. Eventually, I had it all wrapped. I had left a 2.5ft opening in the front centre to put my gate in, so I went side, front, side, and then all across the back. Then I used my pavers/bricks inside AND outside the fence, to press against it and stop any little critters from digging under.

4. To build the gate- pretty much the same idea as the boxes, only with the heavier chicken wire stapled across it. Once you have that box built and covered (I used extra fence posts for the sides, and that way, the gate is the right height! The only difference is, I made sure the extra length of the posts- the part that would be in the ground- actually sticks UP into the sky- and this gives me a handy handle to open my gate with, and also to lock it shut by wrapping it with a bungee cord to the rest of the fencing.), line it up with the fence post that you want the hinges to be on. Mark those spots on your gate AND that post, and do the hinges. Put them at least a handwidth up from the bottom, and down from the top, to better distribute the weight, and save pinched fingers. I attached the hinges to the gate FIRST, then propped the gate into place with a paver, and screwed them into the fence post.

20170515_135807

TADAA!

20170515_152142

(I realize the pavers aren’t in this picture, cuz I actually figured those out later! But you lovely smart folks might want to do that part right away. Also, in the above picture, I hadn’t chicken wired the back fence yet, because I was waiting to check with the neighbours.. it’s their fence. Remember that bit about the scavanged carcass? I don’t want that.)

Happy digging! Stay tuned for updates.. you should see what these babies look like now!!!

-M

Trailer Tales: She’s ALMOST ready!!

Heya cats and kittens!

I owe anyone reading this a HUGE apology, because I have been very lax about updates since we moved out to the Dream Farm. It’s a busier life out here- what with trying to grow grass, doing hair out of a bathroom, and WORKING ON THE TRAILER!

Ooh yeah… there was that one thing.

SHE’S ALMOST DONE!!

Glennie the Mobile Hair Lair is entering her final stages of glamorization, and I’m so damn excited, I can’t contain myself! The WereHusband has been really hard at work getting her finished- and there was a LOT to do! You may recall from past posts about Glennie- she had to be gutted to the studs, rebuilt, reframed, all the windows were removed, resealed, and reinstalled, a new door was found and sized in, the old tanks and assorted craziness were removed, many many many many holes were patched, baby mice were rescued, the roof was resealed several times, and most recently- it was insulated with eco-friendly spray foam, wired for power, and now it has DRYWALL!!!


OH MY!!


Lets do a catch up summary to where we are to date with pictures, shall we? And, as a handy product placement (cuz WereHusband works there, and they are LOVELY), if you are in the SouthWestern Ontario area and need any kind of quality insulation, Ritchies Insulation are the people to hire! 🙂

20170517_16160620170520_13354820170520_133556

So, first pic: Glennie, in her new post-apocalyptic wind location, has been hand-scrubbed with hot soapy water to get off all the dirt (by yours truly! So, honestly, she’s only hand-washed up to the 5’2″ arm-reach part. heh.), because PAINT HAS BEEN BOUGHT! Stay tuned for that, soon!

Second and third pics show the hilariously lime green coating of spray foam, making Glennie year-round workable! The box in the bottom pic is the hidey-hole for the generator, so she’ll have portable power wherever we may roam! Drywall is up, now, and mudding has begun- more pics about those steps, soon! It’s important to note that spray-foam insulation MUST be completely covered by drywall, etc, as it is VERY VERY flammable, and insurance companies get angsty if you leave your property at a cheap-toaster-oven-level of safety.

There are LOTS more renos underway, as she is getting REALLLLLLY close to full glamorization! Stay tuned, and I, in turn, will try not to be so lamely slow with my updates.

Love, Morgan!

Itchy scalp or grease that won’t quit? I’ve got you covered!

Heya cats and kittens!

Now that we’re FINALLY seeing the starts of Spring, it’s time to do a little Spring Cleaning- of our scalps!

Winter can be really rough on our old noggins. All that hot air inside, cold air outside, dryness everywhere, toasty fires, blowdryers, and not enough moisture to go round- this can make anyone’s scalp freak out a little, and be itchy and tight, and sometimes flaky and dry as well. The flip side of all this pasty flakiness is extra greasy hair. So unfair!

Often, when your scalp gets dried out, your body tries to solve the problem by creating extra oil for itself- but this has the negative effect of creating super greasy locks- which then prompt you to wash your hair more than usual, causing an even dryer scalp.. and on it goes! How do we stop the madness?

Come to the rescue, the two hardest working ingredients in your kitchen:

20170403_124642Good old Apple Cider Vinegar, and Baking Soda!

Yep. Now might be where you think I’m just another granola-crazy, modern hipster hippy, using ACV and happy thoughts to solve all your problems. And, well, maybe you’re 80% right there (haha! I can’t eat granola! So there!), but it’s cheap, easy, and really does the trick.

TWO PARTS!

  1. In a dish, mix 2 tablespoons of your favourite conditioner, with 1 heaping tablespoon of baking soda. I like to use conditioner for this step, because you’re going to be washing your hair with shampoo after, and I’d rather you not over strip your hair AGAIN right after I told you to quit doing that so much! haha! Also, it gives the baking soda paste a nice glide around the scalp. Now, hop in the shower, wet down your lovely locks, take a big scoop of the paste you’ve made, and massage it vigorously around your scalp. Give it a good scrub, you know where your itchiest and driest parts are. When you’re done, rinse it out, and give yourself a gentle shampooing (with a good quality, sulphate-free, NO SILICONE ADDED shampoo, please!) to get out any residue and leftover baking soda. This step removes all the dry skin, and takes a lot of buildup off your hair at the same time. Fresh start!
  2. Now, mix 1 cup of apple cider vinegar (and, yes, you can use white vinegar in a pinch, or if you really really hate the smell of ACV) and 1/2 cup of cool water. Get yer yoga on as you pour this over your freshly washed hair and scalp AND NOT INTO YOUR EYES. See what I said there? NOT IN YOUR EYES! You’ll only make that mistake once, my friends. OUCH! You may want to lay backwards over the edge of a sink or tub and pour it on from a measuring cup with a spout, to avoid face splashing- or have a friend, or helpful hairdresser help you out here. hee hee!  Once on, it’s going to feel COLD! Part of that is the cool water, but part is the actual oxygen being fizzily released by the ACV itself. Now massage this cool liquid through your locks and all over your scalp. *IF you have abrasions, psoriasis or eczema that is open, this might really sting. I apologize- but it can also REALLY help with psoriasis and eczema, so keep an open mind. Let it sit on there for a few minutes, and then rinse again with JUST cool water. DON’T SHAMPOO THIS OUT!
  3. Enjoy! You will now have VERY clean, very shiny, very fresh feeling hair. The ACV helps emulsify any overload of oils on your scalp, and also helps reset the pH of your scalp to more healthy, normal levels. You should be feeling fresh and clean- and I personally ENJOY the slight apple scent left behind.. but it’s hardly noticeable, and you won’t smell like french fries all day.

I did it!! How to make a copy of a dress!

Heya cats and kittens.

I DID IT!! Last year I found an adorable pinafore-style dress at a thrift store, and I just love it so much. True, it was actually a size XS- so I had inserted stretch lace (from the lingerie section at your favourite fabric and notions shop) into the sides under the arms, and into the front of the bust- and the black lace just made the whole thing so much cuter! Anyway, I love this thing, and I wear it a lot, and i decided I should really like a second one… but how?

I spoke with an awesome sewing friend (Andrea! haha! Check out her amazing custom made wristlets and wallets at Dancing Daisy ) who reminded me to leave seam allowances, and I was off to the races!

IMG_20170402_134341

The top two photos are the original, and the bottom two are my copy!

TO COPY A DRESS/TOP/WHATEVER:

Paper for tracing (i used taped together flyers from the weekly news!)

2 different colours of marker/pencil crayon

pins for keeping things together

time and patience!

1.To start, I taped a bunch of sheets of spread out flyers together in a spread bigger than the dress I wanted to copy. Then I spread the dress out on it, leaving lots of room around the borders.

2. I traced the entire outline of the skirt part, using one colour of marker. Then I moved the dress over, and traced the top, the straps, and flipped it to do the back. I made sure to mark where the different fabrics were sewn together in each area- ie, the panels that make up the bust. I DID omit the lace panels I had added in the size, and instead measured that as all one piece of fabric.

3. Now i tucked the original dress away, and picked up my second colour of marker. I gave everything a nice 1/2″ border all around, to serve as my seam allowances.

  • The areas with multiple pieces of fabric joined to make a dress piece (front bust area, back top area), I bordered one section, then traced the next section on a new piece of paper, and gave it its own borders, and so on. This way each section which is to be joined together has its own seam allowances for sewing.

4. Once I had all my paper pieces marked, I made sure to label them and cut them out.

5. Now that I had all my pattern pieces, I had a good look at them, and figured out which ones could be simplified by folding in half- for example, the skirt piece was the same for the front and the back, AND could be cut on a fold, since it was symmetrical. I cut the skirt pattern piece in half, and labeled it with a “cut 2 on the fold”.

6. With all my pattern pieces labeled and ready, i pinned them to my fabric as per any pattern, and went to town!

7. TA DAA!!!

I hope you have as much fun and as much luck as I’ve had! Luckily, this was a pretty simple thing to copy, but i’m just pleased as punch at how it turned out! If you try this and copy, please let me know how it works for you!

-M

The wicked wind from the west- Trailer adventures! Oh no!

Heya cats and kittens!

Well, a few of you have heard this tale in person already, but it was quite a little adventure for me, and seems like something interesting to share.

Remember how it was really windy two weeks ago? Like- really REALLY windy. Windy with a lot of f-words thrown around it. Well, anyway, our new Magical Dream Farm has an open field across from us, and our backyard is a giant open field behind us- so we are essentially Tornado Alley around here. On this particularly windy day, reports say winds were up to 95k/hr!, the doors were howling (unsealed, sounding like angry kazoos), the baseboards were freezing (the Werehusband has since sealed them with caulking), and houses were shedding shingles left and right like cats sitting on clean black laundry.

I had just jumped home between a day of running errands, and had a text from the Werehusband asking if the house was still standing, and if we had lost many of OUR shingles- so I went into the backroom to look out into the yard. Nothing! All good! I turned, looking out the side windows at Glennie my Trailer as I did so.. and THAT is when things got crazy!!

AS I WATCHED, the wind picked Glennie (a 27ft trailer!) RIGHT off the ground, slammed her back in, and then swung the whole shebang towards the house!! I thought she was going to go right through the wall- which, coincidentally, is the wall of the Temporarily Glorious Hair Bathroom where I am working while Glennie’s renovations continue.. OH NO!!! Here goes BOTH of my salon spaces at one go!!

LUCKILY!! Glennie got stuck on a bush, and that swung her out of the wind-zone just enough that she kind of lodged there. The Werehusband was able to rush quickly home from work, with the kindness of his bosses, to tie her down however he could.

IMG_20170403_111428

Once the weather was stable enough to investigate, we could see that Glennie was tilted at a crazy angle, her chassis was actually laying on the dirt, and her trailer hitch was sunk flat into the ground! That’s like 2 feet of hitch, punched down into the dirt like it was nothing!!

The Werehusband’s kind boss came on the weekend and pulled her free, and lo and behold… miracle of miracle here… NOTHING WAS BROKEN! And, weirder, the few things that were inside weren’t even tipped over or scrambled around! It’s like in those news reports of campsites and trailers hit by tornados, and some of them are totally gone, and others still have their lawnchairs and whirli-gigs untouched!

So, now Glennie is safely tucked away more behind the house, and anchored to some tie downs (where she will stay when she’s not on the road). PHEW!

I’m surprised the paint didn’t blister off the walls with the force of all my swearing! And I don’t think I’ve ever stared at something so hard in my life, trying to hold her on the ground with the force of my eyeballs. HAHA!

So… adventures continue, and renos are underway.. Stay tuned!

-love, M.

I made it!: Test Human makes Magical Hand Salve (with super easy ingredients!)

Heya Cats and Kittens!

So, this seasonal changey grossness outside can be pretty rotten on our lovely skin. Or not so lovely skin. Or it can make it pretty crappy, really, is what I’m trying to nicely get across here. It stinks. Knuckles crack, cuticles look like saw-toothed dinosaurs, the backs of my hands belong to a 96 year old laundry lady.. things are a bit dry and gross.

My main concern, however, is that the Foxling has inherited my crappy skin- and so his darling little 5yo paws are just as cracked and sore as mine are- which is extra awful, because he has HIS WHOLE LIFE to make them start sucking.

So- TEST HUMAN TO THE RESCUE! Plus, obviously, internet searches, and the shared knowledge of some amazing crafty friends (Sarah E!)- I have made hand cream!

IMG_20170323_154601

You will need:

Shea butter (which comes in BRICKS or little tubs- who knew?)

Vitamin E oil

Jojoba oil (Jo-jo-bah? Sounds like a Jedi! Or.. is it “ho-ho-bah”? I’m not sure how to pronounce this…)

Grapeseed oil

Raw (unpasteurized) honey. (Preferably local, cos YUM! And also- because BEES.)

A glass measuring cup or mixing bowl that can go in the microwave

A microwave (although you could totally do this stove-top style, obviously. I am lazy. I did not.)

Measuring cups/spoons

Small containers, tins, something to put the cream in. This made 3 small tubs like the one in the picture above.


HOW TO DO THIS JAZZ:

1/4 cup Shea Butter, 1 tsp Vitamin E Oil, 1/8 cup Jojoba Oil, 1/8 cup Grapeseed oil- add all these things into your glass measuring cup, and microwave at 15 second intervals until you can stir it all together and not have any lingering lumps.

Now QUICKLY add in your honey- stir vigorously to get it all melted, and pour it into your containers. Don’t dawdle- this stuff sets surprisingly fast!

Pop on the lids, and put your containers in the fridge for about 30min.

TADAAA!!

Seriously. That’s it. It took, like, less than 5 minutes. The hardest part was..um.. nothing. This is not hard at all. And the cream is AMAZING! It melts into your skin with just the lightest of scents, and it soothes all those poor scratchy bits away. I like it so much, I’ve been using mine as face cream! HA!!! (I mean, I won’t in the summer, because I’ll melt away in a pile of oil. but for now? Golden!) I’ve also rubbed some into the dry tips of my very-processed hair.. hehehe. MULTITASKING!

If it gets warm, it DOES start to melt a bit, so you can keep it in the fridge if you want it more solid, or let it sit out for a softer cream/lotion.


ENJOY!!!

-m


*DO YOU make things? Products? Like what? Suggestions? Criticisms? Let me know!

I see the Light! DIY light changing

switchkitchHeya, Cats & Kittens!

So, as we settle in to the Magical Dream Farm, yet another project popped up- changing the kitchen lighting!

Dudes. I was NOT digging the weird frosted samurai looking monstrosity looming in the not-middle of the kitchen. We have a large kitchen island- which this eyesore was NOT centered over. At all. Or really near. Just kind of hanging out at an odd corner of the fridge..

Anyway! First, we thought we might do some sort of track lighting to bring the light over towards the island more… but THEN!

I was wandering through HomeSense with a friend, and they have LIGHTING THERE! did you know that? i MOST CERTAINLY did not! And they have some really cool stuff! Anyway, I found a pendant light that was really neat- the glass is kind of bubbly, and the cord is really long- I almost picked a more modern one with wood involved, but my friend has better taste than me, and pointed out that THIS one is much more unique and vintage-y looking- and she was totally right!

It pays to have smart friends.

I’d love to say the switch was a DIY of mine.. and i know that’s what it says in the heading.. but I’m actually going to call this what it is- a DIPW (Do it Please, WereHusband)! It’s not that i COULDN’T have done it- with supervison, as I have no idea how to do this.. but NOW i know! But- I am very short, and the WereHusband can reach the ceiling from the damn FLOOR- so he was the golden choice for this job. Anyway, TADAA!!! Because the cord is so long, we were able to keep the original mounting base (and not have to rewire stuff.. perhaps not the taste of everyone, but I don’t mind it!) and use a ceiling hook to stretch the light to hang nicely OVER the island (where it damn-well belongs!!). YAY!!!

newkitchlightclose

What do you think? Are you a fan of the black and frosted thingy, or the new look?

-M

Shelving DIY

Hiya, Cats & Kittens

So, now that we are happily ensconced in our Magical Dream Farm, we’ve started completing some of those random little projects that a new home always seems to bring.

I am a BIG FAN of Pyrex. I know it has some detractions- there is a distinct possibility that it may leach lead into food-but it is BEAUTIFUL, and I love it for display anyway.

In our old home, I had a GREAT set up of shelves to showcase my little collection- but with the Grand Relocation, I have no such thing. So I decided to put some up!

First, I had to FIND THE STUDS (heh!) using a Stud Finder. Studs are the long pieces of wood that run up a wall, so the other boards and drywall can screw into them. They are hard (heh, again!), and they are what you want to attach shelves and stuff to, so your nice things don’t fall onto the floor and become significantly less-nice. I marked the studs, and measured how I wanted my shelves to be on the wall (it is a diagonal-type wall, so I needed different lengths of shelf-tracks. I am a big fan of black iron and raw pine used together, and Home Hardware carries BOTH these things, for a very reasonable price.). I needed 2 4ft long tracks, and 1 2ft long track, and then I also needed 7 12″long shelf brackets, and wood for the shelves. I measured a LOT- because I typically kinda slap-dash things, and I wanted to actually appear competent for once.

Here’s my wood! (all the hehs!)

shelfwood

I got all the parts (after a second trip to get the 2ft long part, which I had forgotten about, because I wasn’t thinking about how long the shelves would be), installed the wall parts, and then waited for the WereHusband to come home and show me how to use the Big Scary Basement Saw Thingy that will Surely Remove All My Precious Fingers. And Then Who will Teach You to do Fingerwaves, I Ask You? Who???? uh.. anyway…

I’m sure there’s loads of you out there in the Great Interwebs who are already super handy with shelves, and stud finders (heh!), and measuring stuff, and using a big scary finger-remover (aka giant saw thingy in the basement), but I am a bit namby-pamby about this.. so it is with Great Pride that I show you MY SHELVES!!!

TADAAA!!!

shelvesdone
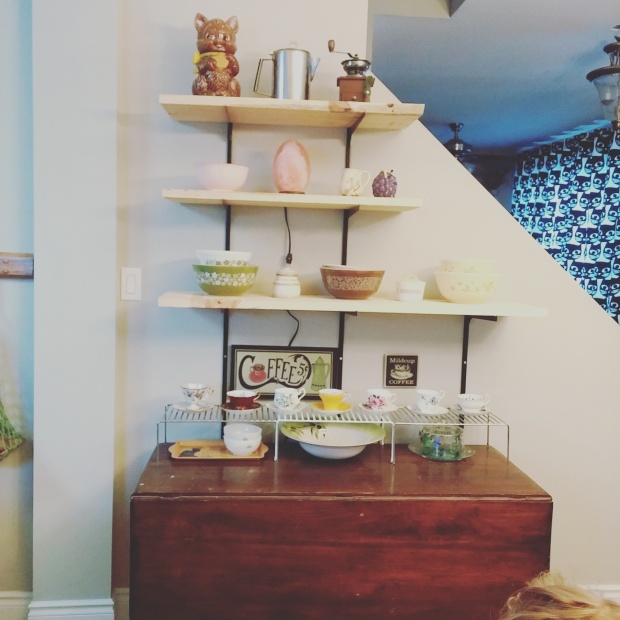
I am very impressed with myself! The coffee sign holds the salt lamp cord against the wall, so it won’t get accidentally grabbed when picking a tea cup! The tea cups are my Granny’s, and the table is my Great-Grandma’s! (and in the bottom right is a pouf of the Foxling’s glorious mop)


So- are you a big DIY type person? Do you measure twice, cut once?

-M

Holy Guacamole- GF Pancakes that DON’T SUCK! Test Human survives!

I did it.

gfpancakes

I don’t know how… I don’t know what blessed stars aligned, or whether I got out of bed on my left foot yesterday, or if I should have bought a lottery ticket… but somehow I successfully created EASY GLUTEN-FREE PANCAKES! (Actually, GRAIN-FREE).

And, they didn’t suck!

Now, I am ok in the kitchen. I cook 99.9% of the food we eat over here at our Magical Dream Farm, and the wise dudes I live with don’t complain. But- I am repeatedly stymied by pancakes. Firstly, I ALWAYS do something wrong with the batter, even when I strictly follow the recipe. Secondly, I can’t seem to pour the batter nicely, so I don’t get nice round shapes, and Lastly, I can’t effectively flip pancakes OR keep the pan an even temperature (apparently), because they get more and more burnt as I go. Yum. NOT!

BUT YESTERDAY, I created DELICIOUS, FLUFFY, SYRUP-ABSORBING, GOLDEN BITES of awesomeness!

And this is how I did it.

YOU WILL NEED:

1 1/2 cups of GF flour/flour blend of your choice. I used PC All-Purpose.

3T baking powder* (I actually used 3 1/2T, but the foaminess was CRAZY, so I’m going to reduce this amount slightly next time, and  I suggest you do the same.)

1T baking soda

2T brown sugar* (I used sweetened almond milk, and IF i use the same next time, I’ll leave out the brown sugar, because they were a little too sweet with both.)

2 eggs

1 1/4cups milk of your choice. I used Silk Almond- sweetened Original

1T vanilla

3T melted butter (plus more for the skillet/pan/whatever)

WIZARD-TYPE MAGIC INSTRUCTIONS:

Mix all your dry stuff together first. You can use one of those fancy sifter thingies- I tried too- but my brown sugar clumped it up and make me angry, and then I had to take a short break and wander around my kitchen swearing.. so do what suits you here. I did this step WAAAAAY ahead of time- like in the morning, when I wouldn’t be making the pancakes until the evening. Just pop a lid on a pyrex or something and keep it uncontaminated until you need it. (And by this, I mean keep all the damn cat hair in this joint outta the mix!)

When you are ready: First! I fired up our “George Foreman” portable grill. The Dream Farm has a big island with an outlet, and I hit on the great idea of setting it up for pancake making like one of those fancy omelette bars at a golf course brunch. 🙂 I set it at 350degrees, then melted a few scrapings of butter.

As that melted, I added all my wet ingredients to my mix, and stirred them together. It got kinda foamy and weird- I was sure it was totally ruined.. but I used my 1T scoop (Pampered Chef), and dropped it onto the hot buttered drill. I used a spatula dipped in a glass of water to flatten out my little blobs a bit, because they just sat on the grill in balls.. and THEN THEY COOKED!

I flipped them after about 2 min, did the other side, added more butter when needed, and repeat!

I can’t believe this worked.

They were golden, soft, and awesome. AND EASY AS ANYTHING! Plus- since I made my mix out of things I already had, instead of buying a pre-made GF pancake mix, I saved about a bazillionty-dollars.

Give ’em a try, and let me know how they work for you! Do you have any easy GF recipes you’ve come up with? And did you eat pancakes for “Pancake Tuesday” yesterday? I’m not religious- but i am a BIG FAN of breakfast foods! 🙂

Be awesome!

-M

Silver hair- Pravana Color Silk

Heya Cats & Kittens!

So, after getting my hair Silver using Organic Colour Systems, I was having some issues with it “blonding up” on me over time. It could be that our Magical Dream Farm has some contaminants in the water.. but whatever the cause, I decided to branch out and try something different!

I have heard nice things about Pravana colour for a few years, and I was curious to try their Color Silk Vivids- especially the Silver colour! This is a conditioning-type colour, which means that it works on the outer layer of prelightened hair, and doesn’t need to be mixed with any developers or peroxides.

The directions suggest using it on clean, dry hair, and processing for around 30 min without using heat. It ALSO suggests doing an allergy test, ESPECIALLY IF YOU HAVE TATTOOS and are sensitive to ink. This is standard for any “funky colours”, as the direct dyes used can cause allergic reactions. Now, I have never known anyone to have an issue, and my sensitive skin has never crapped out on me due to hair colouring, but it pays to be safe- SO IGNORE A WARNING AT YOUR OWN RISK!

The colour has a stronger floral scent than I prefer- OCS is almost totally unscented, but it goes on smoothly and is quite thick out of the tube. This is most likely too messy for home use, as I bet the brighter colours stain like crazy! But the silver is less intense, and felt nice on my hair.

pravanasilvertrial

TADAA!! What do you think? It’s quite a blue-chrome, and over time I notice a lavender tone appear. It seems to last pretty well- I actually just did a tone on my dark regrowth, to make it fade into the silver as a “shadow root”- my ends remain pretty silver/white after just the one all-over application. The smell faded after a wash or two. (Please remember that I rarely shampoo my hair, and really just water-wash it, or use Framesi Colour Care conditioners).

Have YOU tried the “Granny Hair” trend yourself? Thoughts?

-M