Heya cats and kittens.
I DID IT!! Last year I found an adorable pinafore-style dress at a thrift store, and I just love it so much. True, it was actually a size XS- so I had inserted stretch lace (from the lingerie section at your favourite fabric and notions shop) into the sides under the arms, and into the front of the bust- and the black lace just made the whole thing so much cuter! Anyway, I love this thing, and I wear it a lot, and i decided I should really like a second one… but how?
I spoke with an awesome sewing friend (Andrea! haha! Check out her amazing custom made wristlets and wallets at Dancing Daisy ) who reminded me to leave seam allowances, and I was off to the races!
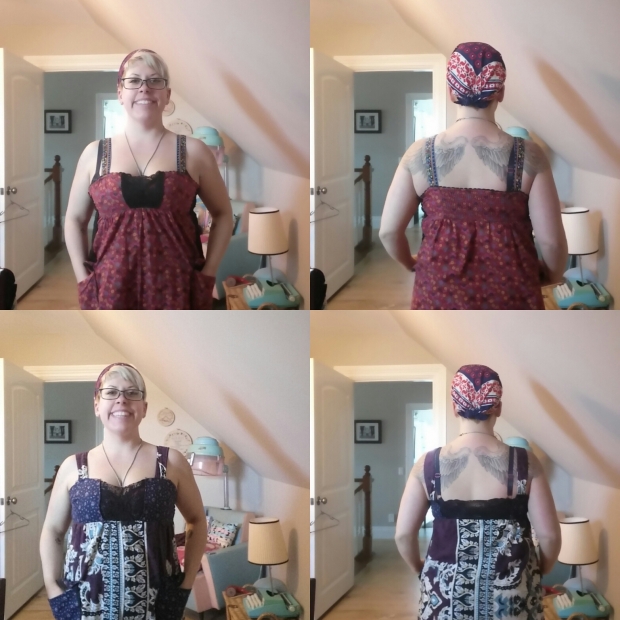
The top two photos are the original, and the bottom two are my copy!
TO COPY A DRESS/TOP/WHATEVER:
Paper for tracing (i used taped together flyers from the weekly news!)
2 different colours of marker/pencil crayon
pins for keeping things together
time and patience!
1.To start, I taped a bunch of sheets of spread out flyers together in a spread bigger than the dress I wanted to copy. Then I spread the dress out on it, leaving lots of room around the borders.
2. I traced the entire outline of the skirt part, using one colour of marker. Then I moved the dress over, and traced the top, the straps, and flipped it to do the back. I made sure to mark where the different fabrics were sewn together in each area- ie, the panels that make up the bust. I DID omit the lace panels I had added in the size, and instead measured that as all one piece of fabric.
3. Now i tucked the original dress away, and picked up my second colour of marker. I gave everything a nice 1/2″ border all around, to serve as my seam allowances.
- The areas with multiple pieces of fabric joined to make a dress piece (front bust area, back top area), I bordered one section, then traced the next section on a new piece of paper, and gave it its own borders, and so on. This way each section which is to be joined together has its own seam allowances for sewing.
4. Once I had all my paper pieces marked, I made sure to label them and cut them out.
5. Now that I had all my pattern pieces, I had a good look at them, and figured out which ones could be simplified by folding in half- for example, the skirt piece was the same for the front and the back, AND could be cut on a fold, since it was symmetrical. I cut the skirt pattern piece in half, and labeled it with a “cut 2 on the fold”.
6. With all my pattern pieces labeled and ready, i pinned them to my fabric as per any pattern, and went to town!
7. TA DAA!!!
I hope you have as much fun and as much luck as I’ve had! Luckily, this was a pretty simple thing to copy, but i’m just pleased as punch at how it turned out! If you try this and copy, please let me know how it works for you!
-M
